
If you’ve searched for an “H1 forex trading strategy,” you’ve probably already read a dozen articles telling you the one-hour chart is the sweet spot for swing traders because it’s “cleaner” than the lower timeframes and less noisy than the daily. I want to tell you why that explanation is wrong, and what actually makes H1 worth your attention.
I start my own top-down read on H1 or H4, and that’s where the decision-making actually happens. That choice isn’t about comfort, personal preference, or believing a professional read only becomes reliable once you reach an hourly chart. A genuine professional read holds up on any timeframe, from M1 to the monthly. I want to walk you through exactly why H1 is where I choose to start, and what that means in practice.
Where H1 Fits in a Top-Down Read
Most trading education tells you to start with the daily chart to “get the big picture,” then work your way down. I do look at the daily chart, and higher, for that bigger picture context. There’s nothing wrong with using them that way, and I wouldn’t skip them.
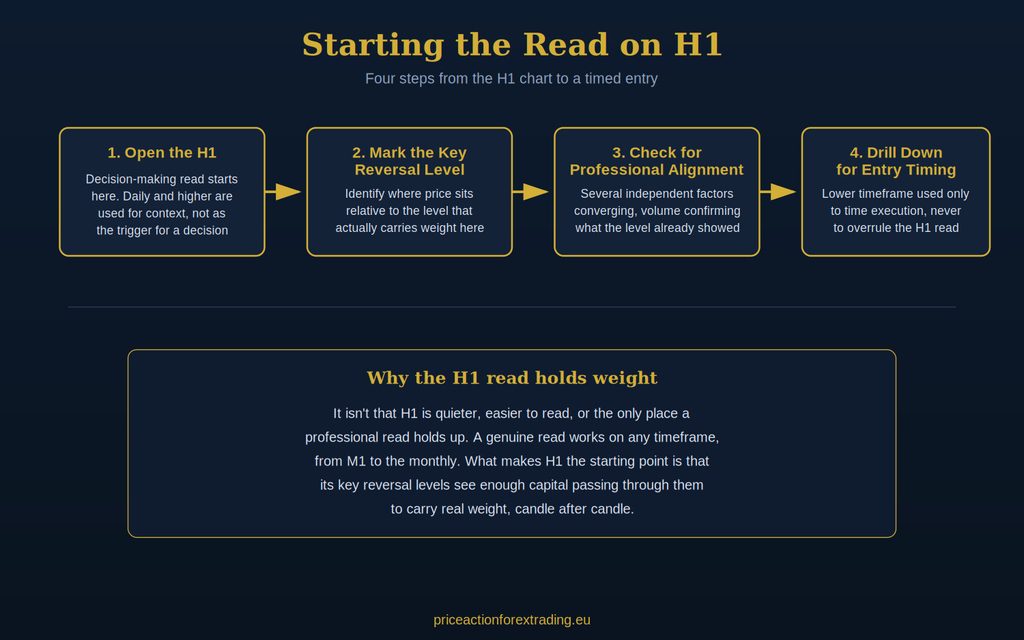
But the daily chart isn’t where my actual read, the one that leads to a decision, begins. That read starts on H1 or H4. Not because higher timeframes skip over meaningful information, and not because a professional read is somehow more reliable up there than it is on M1 or M15. Every candle on every timeframe carries something meaningful. There’s no such thing as a timeframe that’s “full of noise” you can safely ignore, and no such thing as a timeframe that’s inherently “cleaner” either. That framing gets repeated so often in retail trading content that people accept it without questioning it, but it doesn’t hold up once you understand what’s actually happening at each level.
What makes H1 (and H4) genuinely useful as a starting point is simpler than “less noise”: more capital moves through the key reversal levels that show up on these charts. That’s the entire reason the read carries weight there. It has nothing to do with the chart being easier to look at.
This matters because if you believe H1 is valuable because it’s “quieter,” you’ll treat the 5-minute chart as worthless, and you’ll miss what’s actually happening at your entry. If you understand H1 is valuable because of where capital is concentrated, you use it correctly: as your starting point for identifying the levels that matter, not as your only source of information.
If you’re still building your foundation in what price action in forex actually is, that’s worth reading before you go further with any specific timeframe strategy, since everything below builds on it.
Where H4 Fits Alongside H1
I mention H4 alongside H1 because the two work together, not as separate strategies competing for your attention. H4 often shows me a key reversal level forming with more weight behind it, simply because even more capital has passed through it by the time that candle closes. H1 gives me a more frequent read of the same kind of level, which means more opportunities to catch a professional setup as it develops rather than waiting hours for the H4 candle to close. Neither timeframe replaces the other. I move between them depending on how a level is developing, but the read itself, the actual question I’m asking about where price sits relative to that level, stays exactly the same regardless of which of the two I’m looking at in that moment.
What I’m Actually Looking For on the H1 Chart
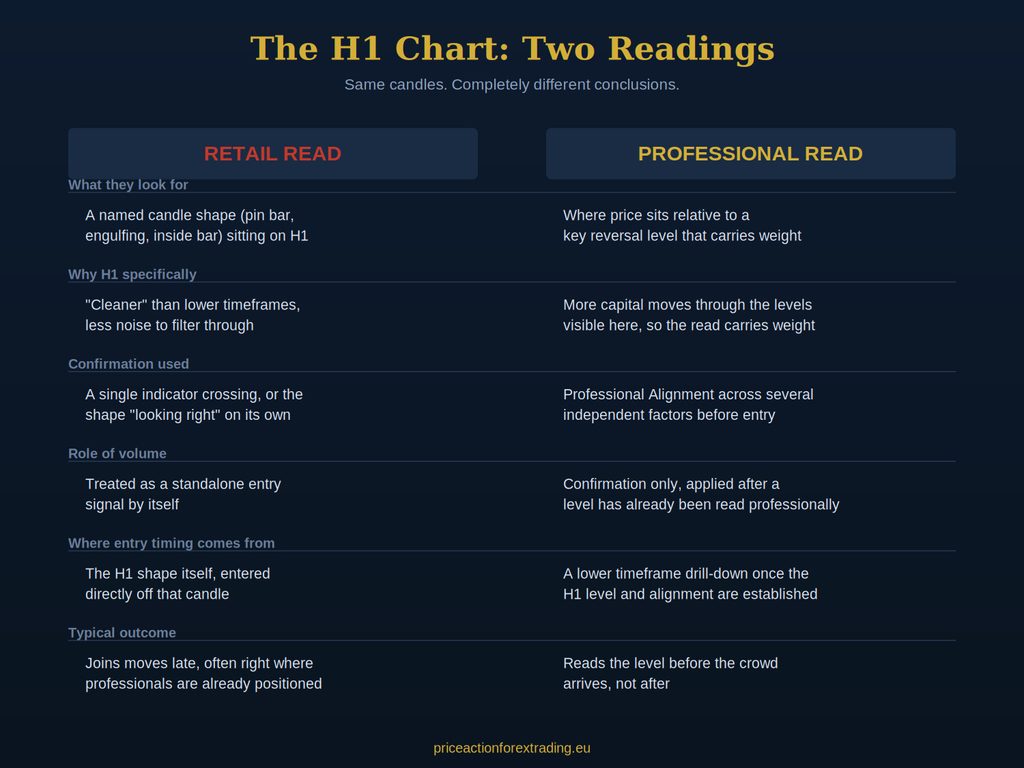
When I open an H1 chart, I’m not scanning for a named candle shape. I’m not looking for a pin bar, an engulfing candle, or an inside bar and treating that shape as my signal to enter. I don’t trade off any publicly named, retail pattern at all. The patterns I actually trade were developed through direct training with my mentor and aren’t something I teach publicly, in this article or anywhere else on the site. They’re reserved for people going through the training course, where they work with me directly.
What I am looking for on H1 is where price sits relative to a key reversal level. These are the levels where the three groups of market participants who move this market tend to act, and understanding their behaviour at these specific points is the actual edge, not the shape of any individual candle sitting on top of them.
This is a different question from “does the market have higher highs and higher lows right now.” I don’t gate whether a level is worth trading on trend structure. A key reversal level can be worth reading whether price is trending, ranging, or somewhere in between. If you’ve been taught to check for confirmed trend structure before you’ll even consider a level, that’s retail-checklist thinking, and it will cause you to sit out setups that are genuinely readable. I’ve written more on this in my piece on how to identify trend in forex, which covers why trend confirmation isn’t the gatekeeper most traders assume it is.
Professional Alignment: Why One Signal Is Never Enough
Once I’ve identified where price sits relative to a key reversal level on H1, the next question is whether there’s Professional Alignment: multiple independent factors converging at that same point, not a single trigger firing in isolation.
This is one of the biggest gaps between how retail traders use the H1 chart and how it actually gets used. A retail approach usually looks like this: spot a shape, check one indicator, take the trade. That’s a single point of confirmation, and it’s exactly the kind of decision-making that leaves a trader entering late, right around the point where professionals are already positioned and starting to take profit.
Professional Alignment means I’m not relying on any one thing. I’m reading how price has behaved into the level, what that tells me about the groups involved, and whether several things line up before I treat the level as tradeable. Volume plays a role here too, but only as confirmation of a read I’ve already made. It never operates as a standalone signal on its own. If volume is the only thing you’re looking at to justify a trade, you’re using it the way retail traders do, as a decision trigger rather than as backup for a decision you’ve already reached through genuine understanding of the level.
Indicators Have a Place, Just Not the Place You’ve Been Told
I do use indicators. That surprises people, because so much retail content around price action trading frames indicators as the enemy, something a “real” price action trader avoids entirely. I don’t avoid them. But they’re the least important part of my decision process, applied only after the H1 level has already been read professionally.
Here’s what actually differentiates a professional use of indicators from a retail one, and it isn’t simply “avoiding indicator-based entries.” Plenty of retail traders also try to avoid pure indicator entries, so that alone wouldn’t set anyone apart. What matters is understanding how retail traders commonly use popular indicators, and what decisions they typically make based on those readings. That knowledge of retail behaviour around indicators is itself valuable information, and it’s something I factor into my own decisions at the level. I go into this in more depth in price action vs indicators in forex, if you want the fuller picture of how that actually works.
So when I do glance at an indicator on H1, I’m not using it to decide whether to enter. I’ve already made that decision based on the level and the alignment around it. The indicator, if I use one at all, is the last piece applied on top, not the trigger that starts the process.
Drilling Down for Entry Timing, Without Overruling H1
Once a key reversal level on H1 has genuine Professional Alignment behind it, I’ll often drop to a lower timeframe to time the actual entry more precisely. This is where a lot of traders get confused about what “multi-timeframe analysis” is supposed to mean.
The lower timeframe doesn’t get a vote on whether the trade is valid. It doesn’t overrule what I’ve already read on H1. Its only job is to help me time the execution once the decision has already been made. If you’re using a lower timeframe to second-guess or re-validate what H1 already told you, you’ve inverted the relationship between the two, and you’ll end up hesitating on setups you should have already taken, or worse, talking yourself out of good reads because a 5-minute candle looked unconvincing in isolation.
Common Mistakes Traders Make with H1 Strategies
A few patterns show up repeatedly with traders who come to me after trying to build an H1 strategy on their own. Most of these aren’t a lack of effort. They come from following widely repeated retail advice that sounds reasonable on the surface but doesn’t reflect how the H1 chart actually behaves at a key reversal level. Here’s what I see most often.
Treating the daily chart as the required starting point. Waiting for daily confirmation before acting on an H1 setup causes traders to miss levels while they’re still tradeable. By the time the daily chart “confirms” anything, the professional opportunity at that level has often already played out.
Chasing breakouts and retests as if they’re a professional method. I don’t trade breakout-and-retest setups, and I’ve written about why I don’t trade it and what I do instead when price moves through a key reversal level on H1. It’s predictable retail crowd behaviour, and reading it is useful, but not the way most retail content teaches you to use it.
Calling a move a “false breakout” and moving on. There’s no such thing as a false breakout in the sense most retail traders mean it. What gets labelled that way is a readable event to someone who genuinely understands what happened at the level, not some unpredictable market quirk. Reacting to a “failed breakout” after the fact, rather than reading the level beforehand, is a symptom of the same retail-checklist thinking that shows up everywhere else on this list.
Restricting H1 setups to certain sessions. I don’t limit valid H1 setups to London or New York open. A professional read works at any time of day. What changes across sessions is liquidity context, not whether the strategy itself is valid.
Expecting slow, incremental progress. A lot of trading education leans on the idea that improvement has to be gradual, that you should be patient through plateaus and losses because progress “isn’t linear.” I don’t subscribe to that framing. Under the right training, results and understanding can come quickly, sometimes within a single session. If you’re stuck rereading the same H1 chart without a shift in how you see it, that’s usually a sign you need direct training from someone who can show you what you’re actually missing, rather than more time spent alone with a chart.
Building This Into a Full Strategy
Everything above describes how I read the H1 chart, but reading a level correctly is only part of a complete trading process. The decision-making and execution stage, applying professional thinking with professional knowledge at the moment it matters, is the part that actually separates results, far more than any checklist or mechanical rule set could.
If reading key reversal levels on H1 with genuine Professional Alignment is new to you, my Forex Training Course walks through the full framework behind everything in this article, built for both new and experienced traders. And if you want to see this approach taught end-to-end using a single strategy you can start trading with immediately, Learn to Trade in 5 Days is a complete, standalone course built around exactly that.
Final Thoughts
The H1 chart isn’t valuable because it filters out noise. It’s valuable because of where capital concentrates around key reversal levels, and because a genuine read of participant behaviour at those levels holds up, candle after candle, in a way that chasing named shapes never will. Start there, look for alignment rather than a single trigger, use lower timeframes to time your entry rather than to second-guess your read, and you’ll find the H1 chart tells you a great deal more than most retail content gives it credit for.
Thanks for reading and have a beautiful day!